Tag Archives: bathroom shelf

Little Things and Big Changes

Now that things are official, I thought it would be a good time to announce some big news. There’s a reason there has been a crunch to get projects wrapped up this spring and make our house look presentable – we’re moving to Connecticut! I know I’ve mentioned Nik has been applying for faculty positions at universities, and he’s officially accepted a position at the University of New Haven. We’re planning to list the house in mid May and move in early July, so I’ve made an industrious list of all the little things that needed to be finished up before scheduling home pictures and preparing to show the house, and we’re plowing right through it.

One of the things on our list was updating some things in the guest bathroom: IMG_0344

We started with just replacing the tub faucets (which of course required some additional purchases because of mismatches with the valve styles and trying to match brushed nickel from different manufacturers) and the sink faucets. The new sink faucet looked nice…

IMG_0345

…but Nik realized the vanity top had a chunk missing out of the area around the drain, so the new drain was dripping, and caulk did not fix the issue. So, one thing led to another and we ended up replacing the entire vanity top with a pretty basic one from Home Depot.

IMG_0349

It was only $135, but made such a huge difference in brightening up that room. We then painted the bathroom walls with a mixture of old paints from other rooms in the house (free!), and I love the light grey color it ended up as.

IMG_0348

That was supposed to be the end of the updates for that room….but with how nice it was starting to look with just those few changes, we decided that we couldn’t neglect the other things in this room. So we decided the old white linoleum floor had to go!

IMG_0344

We wanted to replace it with something simple that could be done in a day, so we decided on floating vinyl planks. My research suggested that we could put it directly over the linoleum we have since it is flat, in good condition, and not very cushioned. We also considered the peel-and-stick vinyl planks, which can be grouted or just butted up edge to edge, but it actually seems like these perform more poorly on linoleum since any amount of cushion-y ‘give’ in the subfloor can cause the seams to part, thus damaging the grout used over time, and potentially allowing dust to get under the floor and weaken the adhesive. Also, any flooring that is directly adhered to a substrate vs. floating will have potential to cause buckling with temperature/humidity fluctuations since there is no flexibility for expansion and contraction. The cost difference between the peel-and-stick and the floating click lock planks wasn’t substantial, so we went with the click lock floating version.

We liked the wood-look options at Home Depot, and brought home some samples:

IMG_0418

We decided on the bottom right one, since it had a good combo of greys and warm colors to match the vanity, which we are not going to have time to update. Last weekend Nik removed all the quarter round trim surrounding the floor while I was away at a conference in Chicago. And then this weekend, we headed over to Home Depot to purchase the planks. And then it all went downhill…apparently that style is not stocked at the store, and we probably wouldn’t get it until the second week in May. No good. We (well, mainly I…Nik was ready to put just about anything on the floor at the end of this torturous Home Depot visit) didn’t like any other options that Home Depot had in stock at the store, so I convinced Nik to go over to Lowe’s to see if they had any better color options. Luckily, they did! We finally selected this product:Product Image 2

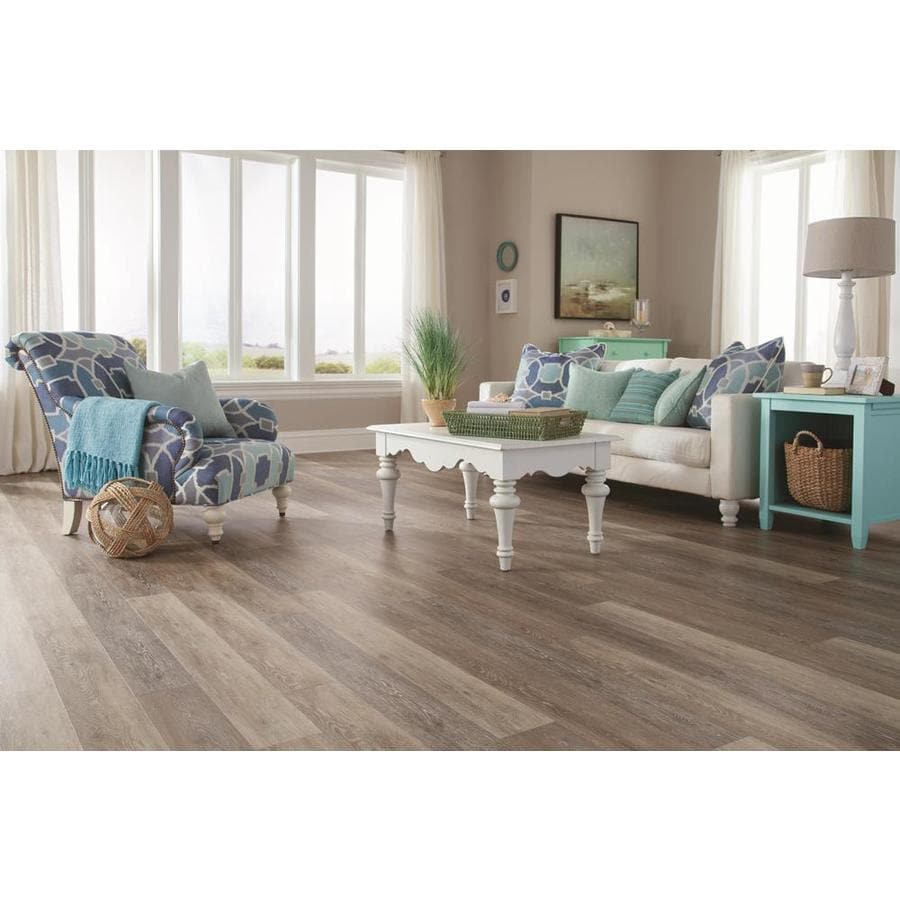
It’s a luxury vinyl plank, click lock sides, and even a bit cheaper than the one we were considering. We had to buy 40 square feet of it (2 boxes) despite only having to cover about 30 square feet, but the total cost including a new piece of trim for the wall was $100.72.

Nik did most of the install, of which the hardest part was using the Dremel to cut some of the baseboard trim and around-the-door trim to allow this to slip under – since of course our room isn’t square and plumb, and it’s easier to cut the wood. The rest was just laying planks and trying to get the plank colors nice and varied. Here’s some progress pictures – and notice, once again, we have a toilet in a tub for this install. This seems to be a theme around our house…

IMG_0442

IMG_0450

To cut the planks, you basically just use a razor, and snap them:

And for cutting around the toilet flange, Nik used a hairdryer to heat up the vinyl to soften it and then just used a cereal bowl curve for guidance. Here’s the finished floor, as of last night, with the second picture probably closer to the actual color:

IMG_0456

IMG_0457

We still have to install the trim and obviously get the toilet back in place, but as of now I love it! It feels awesome underfoot – super solid, and a very high quality feel. I’m not sure how it would hold up against pet nails since it is technically in the linoleum family of materials – and it can sort of scuff/tear – but overall it is more resilient and sturdy feeling than traditional linoleum. Fortunately Gunnar doesn’t go in this bathroom too frequently, although this room was of much interest to him while we were trying to work in there this weekend since we just gave him a bath in it Saturday morning. This might sound like a negative experience for this room, but I’m not entirely sure Gunnar realizes he’s ever gotten a bath in our house because bath time always comes with a thick smear of peanut butter on the wall of the tub. When ample peanut butter is involved, you could probably amputate one of his legs and he might not notice, so I think bath time is really just peanut butter time in Gunnar’s head. So Gunnar has been in and out of this room all weekend to check that more peanut butter hasn’t appeared in the tub – but so far, so good for the floor.

Once that room is wrapped up, the list of things to do will be pretty small. I don’t think I ever showed pictures of the finished shelves in our master bathroom, so here’s how that turned out:

IMG_0423

IMG_0424

For other jobs, this weekend I got some painting done on the mailbox and some other exterior things, and we have to give our front door one more coat of stain, I have one more coat of caulk to put in the crown molding downstairs, and Nik has 2 more light fixtures to update in the kitchen. Our lawn and gardens look fantastic this spring, and we’re feeling very confident going into this house-selling process – not that it’s been an easy road to get to this point!

Lots of friends and coworkers know that we’ve done all these renovations on our home, and they keep asking us if we’re sad to leave all our work behind. I’m not sure how to answer this. Of course I love the things we’ve done to our house, and I’m finally starting to feel at home in it and not like I’m coming home to a construction site every night. But I think I still went into this house knowing we wouldn’t be there forever. And now that we’ve learned from all the mistakes we’ve made on various projects, I think we’re more equipped to put the same love into our next home. We both want a place with a better yard and more land, a house with more character (not a ‘development’ home), and a house that has good bones but needs the updates that will make it our own. Hopefully we’ll find what we’re looking for in Connecticut – but we’re planning to take a year off from home ownership and rent, so we’ll have time to find the best location to look for a home in, and less pressure for the home-selling process. Part of me is super depressed that I’ll have to go from our totally renovated, beautiful home to a rental that will surely be less…nice, but part of me is relieved that we’ll have no lengthy weekend renovation to-do lists for a while, and we can spend our weekends getting to know the new area.

So that’s our update! A few more weeks till it’s on the market!

2016 Year In Review

2016 has come to a close, so I wanted to look back at the progress we made. This was a busy year, with both of us still adjusting to our new careers and planning our October wedding. But I think we made enormous progress on the house, and reflecting on all that we accomplished will hopefully be motivation to keep up the hard work this year.

In early 2016, we finally wrapped up the trim and painting on the stair column – at this point, we still need to add some base and top trim, but we’re planning to install the crown molding downstairs sometime this spring, so that will be the final step of this job. Apparently I haven’t taken a picture of the column after it was painted, so this is the best one I’ve got:

IMG_0709

The next big project of 2016 was our downstairs powder room. What began with a new toilet seat resulted in a gutted room and complete renovation. We painted, tiled and grouted the floor and backsplash, installed a new vanity with a new faucet, new mirror, new towel/toilet paper holder fixtures, and a new threshold.

We installed all the chair molding trim in the dining room, completed refinishing the china cabinet, and got our dining room furniture all set up to finish this room.

IMG_2298

We built 2 raised bed gardens which did pretty well last year. I just bought seeds for 2017, which I’ll start inside next month. I’ll be planting cucumbers (pickling size and regular), bush string beans, snow peas, eggplant, jalapeno pepper, bush zucchini, roma and grape-sized tomatoes, spaghetti squash, mescalin, leeks, garlic, and various herbs. If anyone wants extra seedlings, let me know!

Our furniture work this year was pretty pitiful, and I hope we have more time to do furniture projects in 2017. The two big pieces we did this year were building a front porch bench, and redoing  a small set of shelves for our master bathroom:

Our biggest renovation of the year was the kitchen. In this room we replaced the flooring with our engineered hardwood, sanded, primed, and painted all of our cabinets and installed one more new cabinet on the far wall, added new cabinet hardware, got granite countertops and a new sink and faucet installed, tiled/grouted/applied sealant to the backsplash, got all new appliances and mounted the microwave over the stove, created open shelving on 2 walls, and painted the walls.

In this room the final projects for this spring are installing cabinet crown molding at the tops of the cabinets, finding and installing new light fixtures, and building our island, which will have matching granite.

We also bought a new HVAC system (gas package with AC and furnace) and just updated our laundry room with a new washer and dryer last month, but these don’t make for fun pictures, just not-so-fun expenses. But they are upgrades nonetheless.

So what’s on the list for 2017? First we want to finish up the final tasks downstairs: cabinet crown molding in the kitchen, ceiling crown molding in the entryway, living room, dining room, and possibly powder room, building a functional kitchen island, getting a stupid banister installed on our stairs (still hasn’t been done!), and adding new light fixtures for the kitchen and dining room. I also want to get my gardens going in March, and finish creating a bordered backyard flower garden out of the extra jungle gym wood. We also are ordering new blinds for almost all the windows on the house that will be the thicker wood-look blinds, so we’ll have to install those when they come in. We also need to have the house washed and gutters cleaned (which we’ll hire out for lack of good ladders) as well as have the lawn aerated before we seed it.

The big project of 2017 will take place in the summer months when Nik doesn’t have a 2 hour commute twice a week for his teaching responsibility at UNC Pembroke: our master bath renovation. For this, we’re planning to tile the floor, refinish and raise up our vanity and add undermount sinks with a nicer (possibly granite) countertop, paint the walls, rip out the old shower, replace the shower pan and tile the walls, add a new glass shower door, and add new faucet hardware for the sinks, shower, and tub. After vaguely tallying up what we’ve spent on this house so far, we’re around the $15K mark, so we’re going to attempt to keep the budget pretty tight for the bathroom – ideally in the $2000 range. Cheers to 2017!

Bathroom Shelf And Kitchen Walls

Over the past couple months we’ve slowly been working on a project that Nik bought while he was home over Christmas. We wanted something to put in our bland bathroom under the window to store bathroom items and towels. Our window is low in there, and finding something low and slim was challenging.

Here’s what Nik bought, and I can’t remember what he paid for it, but it was somewhere around $20 or $30.

It appeared to be made of wood, from looking at the bottom, so Nik stripped the paint and some very pretty wood was underneath:

We sanded this thing using our Mouse mini-sander, and then stained the outside with special walnut, and painted the inside with a dark gray-blue paint I had picked up off the clearance/mismatch rack at Lowes for $5. The feet were painted white – they stand out a lot on the linoleum now, but I think once we get our whiter tile in here I’ll like them more. If not, they’ll eventually get the gray paint too.

IMG_2747

IMG_2748

It makes our awful white bathroom look so much warmer, so I’m really happy with how it turned out.

This past weekend we spent painting the kitchen walls and priming cabinets…I’ll give you a sneak peek at the wall color. This paint almost killed me. We cut in with it first, to get all the edges around the ceilings and doors, and I hated it – it looked so dark, and almost purple-blue. Ugh. I was sure we’d end up having to buy new paint, and redoing the whole room. This was actually the paint we originally bought for our cabinet color, and on the practice cabinet door we had painted it looked totally different – a very pretty warm gray. But I insisted we give it a shot and do the whole wall anyway:IMG_2744

And once the whole wall was painted as opposed to just the edges, I loved it! It doesn’t look purple anymore, just crisp and fresh light gray. So weird how that can happen, but I’m relieved.

We also officially picked our cabinet paint, and despite obtaining approximately 500 paint chips, we (well, it was me to be more accurate) still couldn’t decide. We were between two colors, and there were things we liked about one and things we liked about the other. So we bought sample sizes and mixed them, and the result seemed perfect! So I marched into Lowe’s to get a gallon, and explained to the nice paint-mixer gentleman that his hundreds of colors were not enough selection for me, and I needed a custom gallon that was half one color and half of another. He laughed (I’m pretty sure he thought I was crazy) and told me no one had EVER asked him to do this. But, I know they can mix up quart sizes of colored paint, so I asked if he could tell the machine to add 2 quarts-worth of each color into the gallon can to result in the right color for a gallon. The guy was excited to see if this would actually work, and in the end the color match was nearly identical to our homemade 50/50 mix paint.

So what color scheme did we decide on? Well, Nik was insistent on getting some green in the kitchen, so we basically flipped our original  color plans (gray cabinets, green walls) and the plan is now to do darker green cabinets with the light gray on the walls. We’ve named our custom green paint “Indecision Green.”

Once we get some actual cabinets painted and looking nice, I’ll show pictures of the color, but don’t hold your breath because this is the current disheveled state of our living room/cabinet progress…and this is only about a third of all the cabinets. I decided to go through the hassle of painting as much as I can inside where the humidity is lower to prevent tacky cabinets. So all these will get 2 coats of primer, and probably 2-3 coats of paint.

IMG_2735

And I’ll leave you with this inspiration picture from Fixer Upper, in case you think we’re totally crazy, and have no faith that a green kitchen with wood floors can end up beautiful! fixerupper green kitchen